Chimney Experts

Why Hire Chimney ExpertsWhy Hire Chimney Experts

Owning a fireplace can bring warmth, charm, and comfort to a home. But what many homeowners don’t realize is how much behind-the-scenes care a chimney needs to stay safe and working properly. You might think a quick clean with a broom or vacuum is enough, but that’s where mistakes begin. When it comes to keeping your fireplace running safely and efficiently, there’s one group of people you should always call—chimney experts.

Chimney experts do more than just sweep out ashes. They spot danger before it starts, fix small problems before they grow, and help you avoid big bills down the road. If you’re wondering whether it’s worth hiring them, here’s what you need to know.

Chimney Experts Keep Your Home Safe

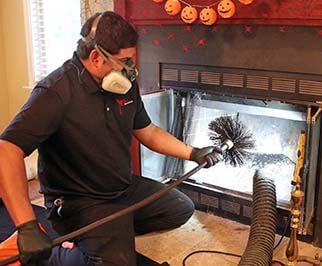
Fires start in chimneys more often than most people think. Creosote, a thick, sticky substance that forms when wood burns, is one of the biggest causes. It builds up inside the chimney walls and can catch fire if it gets too thick. Chimney experts are trained to remove creosote safely and thoroughly. Unlike basic DIY tools, they use professional brushes, vacuums, and inspection cameras to make sure nothing is left behind.

Chimney experts also check for cracks, loose bricks, or animals that might be living in the flue. These problems can block the chimney and cause smoke or carbon monoxide to leak into your home. If you want your fireplace to be warm but also safe, chimney experts make sure everything is running the way it should.

Here’s a quick list of things chimney experts check that most homeowners miss:

  • Creosote buildup
  • Animal nests or blockages
  • Flue cracks or broken liners
  • Chimney crown damage
  • Water leaks around the chimney

That’s why so many homeowners now trust certified local professionals to keep their fireplace systems in top shape year-round.

Chimney Experts Help Save You Money

It might seem like hiring chimney experts costs more than doing it yourself, but the truth is, they can save you money. When you skip proper cleanings or repairs, your chimney can get worse over time. A small crack today might lead to a collapsed flue or major water damage next season.

Fixing major damage can cost thousands. But with regular inspections from chimney experts, small problems are caught early and solved quickly. That means you spend a little now to avoid spending a lot later.

Also, when your chimney is working properly, your fireplace burns more efficiently. That means you get more heat using less fuel—saving money on firewood or energy bills. And for homes with gas fireplaces or stoves, chimney experts make sure gas lines and vents are clear and safe, helping your systems last longer.

Here’s a simple comparison:

TaskDIY AttemptDone by Chimney Experts
Basic CleaningIncompleteFull creosote and soot removal
Structural CheckOften MissedInspected with pro tools and lights
Leak PreventionOverlookedSeal cracks, check flashing and caps
Safety RiskHigherFully assessed and reduced

If you’re in California, chimney experts in places like California provide year-round service so you’re not stuck when you need help most.

Chimney Experts Make It Easy and Stress-Free

A lot of homeowners delay chimney cleaning because it sounds messy or hard to schedule. Chimney professionals take care of everything. They show up with drop cloths, vacuum systems, and protective gear to keep your home clean. Most visits are done in under an hour, and they’ll even give you a written report after the inspection so you know exactly what was done.

If your home is older or you’ve just moved in, chimney professionals also offer helpful advice on how to use your fireplace safely. They can recommend caps to keep rain out, screens to keep sparks in, and liners to make sure your chimney stays clean longer. This kind of guidance is especially valuable for new homeowners who are still learning the ropes.

To make managing home upkeep easier, more people are now using modern platforms that connect smart home tools and professional services together—helping track schedules and reminders for things like chimney care, gutter cleaning, or HVAC checkups.

FAQs

How often should I hire chimney sweeps for cleaning?
At least once a year. If you use your fireplace heavily in winter, consider two cleanings—one before and one after the season.

Are chimney sweeps certified or licensed?
Yes. Reputable chimney experts are certified by professional organizations and follow strict safety standards. Always ask to see proof of certification.

Is chimney cleaning messy?
Not when done by chimney experts. They use protective covers and vacuums to keep soot from spreading in your home.

Can chimney experts repair damage too?
Yes. Many also provide repair services for liners, masonry, caps, and even waterproofing.

How do I choose the right chimney expert?
Look for local experts with good reviews, certification, and experience. Always ask for an inspection report after the visit.


Hiring chimney experts may seem like a small detail in the big picture of home care, but it can make a huge difference. From fire safety and air quality to heating efficiency and long-term savings, they bring knowledge, tools, and peace of mind that no DIY solution can match. Whether you use your fireplace once a week or once a year, putting chimney care in expert hands is one of the smartest decisions you can make.

READ MOREREAD MORE
Contemporary Wall Panels

Redefining Interiors with Contemporary Wall Panels DesignsRedefining Interiors with Contemporary Wall Panels Designs

A Fresh Approach to Interior Styling

Have you been looking to give your interiors a fresh lease on life? Designers who want to create spaces that are attractive, contemporary, and acoustically improved might use contemporary wall panel designs, particularly slat wood panels, as their secret weapon. Not only are these panels fashionable, but they are also adaptable, long-lasting, and well-known for their ability to enhance the aesthetic of any area with their clean lines and natural warmth. Whether you are renovating your living room, building a feature wall, or improving the mood of a professional space, slat wood panels bring a one-of-a-kind blend of refinement and functionality to the table. The fact that they help minimize echo, add architectural interest, and create a unified style that mixes function and form in a seamless manner makes them an ideal alternative for interior modifications.

Stylish, sustainable, and simple to install, slat wood panels are more than just decorative—they’re transformative.

Why Slat Wood Panels Are Gaining Popularity

Slat wood panels’ exceptional ability to seamlessly combine form and function has made them a design mainstay in both residential and commercial spaces. While their structural advantages aid in sound absorption and spatial clarity, their sleek, linear look lends a sense of architectural beauty. Slat wood panels provide texture, warmth, and rhythm to any area, whether they are utilized as a room divider, ceiling treatment, or statement wall. They are a flexible option for both interior designers and homeowners since they go well with a variety of styles, from Scandinavian and minimalist to modern and rustic. They’re popular in contemporary interior design and are increasingly being used to create sophisticated, well-balanced spaces for the following reasons:

Sleek Aesthetic Appeal

Slat wood panels offer a visually compelling solution to flat, uninspired surfaces. Their vertical lines add depth and rhythm to rooms, instantly elevating the ambiance. Available in various finishes and wood tones, they suit everything from minimalist homes to luxurious office spaces.

Looking to enhance a room with style and character? Slat wood panels in Encino are a great example of how local installations can make a lasting impact.

Acoustic Performance

In interior design, sound quality is sometimes neglected; however, slat panels are an exception to this rule. Due to the fact that their construction naturally minimizes background noise and dampens echo, they are an excellent choice for environments in which clear sound is crucial. Houses with open floor plans, creative studios, and meeting areas are all examples.

Sustainability and Convenience

Most modern slat wood panel wall systems are made using eco-friendly materials and responsibly sourced wood. Not only are they sustainable, but they’re also easy to install. With minimal tools and time, you can transform a blank wall into a design statement.

Routine maintenance is simple, too—just a quick dust or wipe is all it takes to keep them looking pristine.

Inspiring Ways to Use Slat Panels

Contemporary wall panels open the door to a range of design applications. Here are a few creative uses:

Accent Walls with a Statement

Create architectural details out of walls that are otherwise plain. Creating a stylish focal point with texture and tone may be accomplished by using panels behind beds, televisions, or dining tables.

Modern Room Dividers

Slat panels are a fantastic option for open floor plans because they allow for the definition of distinct zones without negatively impacting the flow of natural light or the general flow of the space. They are ideal for lofts, studios, or multi-use rooms that demand both flexibility and order because of their open and linear form, which preserves a sense of airiness while also providing visual separation between regions. It doesn’t matter if you’re constructing a reading nook, a dining area, or a semi-private workplace; slat panels give structure and design without the weight of solid walls, which makes them an intelligent and fashionable option for contemporary living.

Ceiling Enhancements

Think beyond the walls. Slat wood panels on ceilings can bring unexpected drama and warmth, giving your space a unique edge.

Conclusion

Contemporary wall panels are the ideal blend of aesthetics, sustainability, and acoustic efficiency. Their versatility makes them suitable for everything from personal home upgrades to commercial overhauls. Whether used as a ceiling treatment, divider, or accent wall, they deliver high style with minimal effort.

Explore more innovative design solutions with Worldigital—your guide to elevating interiors with purpose and precision.

READ MOREREAD MORE
Slat Wood Wall Panels

How to Keep Your Slat Wood Wall Panels Looking Brand NewHow to Keep Your Slat Wood Wall Panels Looking Brand New

Slat wood wall panels give a place a sophisticated and organic appearance. Whether you are enhancing a home area or converting a business location, the linear design, rich textures, and warm tones of these materials create a welcoming ambiance. However, in order to keep that sleek and clean appearance, some care and attention is required.

The purpose of this tutorial is to provide you with information on how to efficiently clean and care for your slat wood wall panels so that they continue to look great for many years to come.

Why Maintenance Matters

Slat wood wall panels are more than a design trend—they’re an investment in style and ambiance. From Agoura Hills installations to urban loft renovations, these panels demand consistent upkeep to retain their charm and structural integrity.

Benefits of Regular Cleaning

  • Preserves Natural Finish: Dust and grime can dull the wood’s surface over time.
  • Improves Indoor Air Quality: Clean surfaces mean fewer allergens in the air.
  • Protects Against Damage: Regular care reduces the risk of scratches, stains, and warping.

Avoiding Common Mistakes

Keep in mind that the use of strong chemicals or an excessive amount of water might cause finishes to deteriorate and cause warping. The use of low-impact tools and the appropriate methods can go a long way.

Cleaning Essentials and Step-by-Step Instructions

To properly maintain your slat wood panels, you don’t need an arsenal of equipment—just a few key tools and some consistency.

Tools You’ll Need

  • Microfiber Cloths: For light dusting and general surface cleaning.
  • Soft-Bristled Brush: Great for cleaning in between slats without scratching.
  • Vacuum with Brush Attachment: Perfect for deep-cleaning grooves and textures.
  • Mild Wood Cleaner: Only use for stubborn spots—ensure it’s compatible with your panel’s finish.
  • Dry Lint-Free Towel: To immediately dry panels after any damp cleaning.

Cleaning Process

  1. Dry Dusting: Begin by using a microfiber cloth to gently wipe the surface of your panels.
  2. Brush Out Grooves: Use a soft-bristled brush to clear out dust between slats.
  3. Vacuum Thoroughly: With the brush attachment, vacuum along the slats to collect residual dirt.
  4. Spot Clean If Needed: Lightly moisten a cloth with wood-safe cleaner for stains—always test on a small area first.
  5. Dry the Surface: Use a dry towel immediately to prevent water absorption.

In addition, it is essential to constantly clean in the direction of the wood grain in order to produce the best possible results and to preserve the natural texture of the wood.

Long-Term Care Tips for Lasting Appeal

Even while cleaning is highly important, if you want your slat wood panels to last as long as possible, you must also create the suitable atmosphere and daily routines around them. This is necessary in order to ensure that they survive as long as possible. Even while cleaning is highly important, if you want your slat wood panels to last as long as possible, you must also create the suitable atmosphere and daily routines around them. This is necessary in order to ensure that they survive as long as possible.

Control Your Environment

  • Humidity Matters: Keep indoor humidity levels between 40–60% to prevent the wood from expanding or contracting.
  • Sunlight Exposure: Use curtains or blinds to limit direct sunlight, which can fade wood over time.
  • Ventilation is Key: Keep air flowing and clean to prevent dust buildup.

Smart Placement & Furniture Awareness

  • Avoid placing furniture that presses against the panels.
  • Use protective pads where necessary to reduce contact.

Seasonal Upkeep

  • Every 6 months, apply a wood conditioner or polish to maintain shine and nourishment.
  • Check for signs of wear, warping, or fading—address early to avoid larger issues.

Designed for Style, Built to Last

Slat wood panels are a versatile and attractive option that can be used for decorating a large number of different spaces, including a modern entryway, an open-concept workplace, or a warm bedroom. You will be able to appreciate their natural beauty for many years to come if you give them some regular maintenance. These items are a perfect complement to homes that are either rustic or minimalistic, and they lend an aura of refinement and warmth to any room.

For professional-grade design and installation insights, visit Worldigital—your digital partner in bringing architectural aesthetics to life.

READ MOREREAD MORE
wall panels

Revitalize Your Living Room with Elegant Wall PanelsRevitalize Your Living Room with Elegant Wall Panels

Redefining your living space doesn’t require a full renovation. A simple yet transformative solution lies in wall panels—versatile design elements that blend functionality with timeless style. Whether aiming for sophistication, warmth, or modern flair, wall panels provide a powerful design upgrade.


The Benefits of Wall Panels in Modern Interiors

Wall panels are more than decorative—they’re a smart investment in your home’s comfort, appearance, and durability.

1. Visual Impact and Character

Wall panels introduce dimension, texture, and style to otherwise flat walls. From intricate patterns to rich wood finishes, they create striking focal points and elevate the overall aesthetic. Whether your vision leans rustic, traditional, or ultra-modern, there’s a panel style to match.

2. Thermal and Acoustic Efficiency

Materials like wood, MDF, and PVC enhance insulation. Wall panels help maintain indoor temperatures, reduce energy consumption, and offer soundproofing benefits. This makes your living room more comfortable and serene year-round.

3. Long-Lasting and Low Maintenance

Quality wall panels are built to withstand daily life. Unlike paint that chips or wallpaper that peels, panels resist scuffs, moisture, and aging. Most require only occasional dusting or a gentle wipe-down, making them ideal for families and pet owners.

4. Concealment with Style

Wood panels are an elegant solution for hiding flaws, cracks, stains, uneven surfaces, or exposed wires. Instead of costly repairs or repainting, panels provide a sleek, finished look while masking imperfections.


Top Wall Panel Styles for a Stylish Living Room

Selecting the right style is key to enhancing your space. Here are some standout panel designs to inspire your living room transformation:

1. Classic Wainscoting

Wainscoting panels extend partway up the wall, traditionally to chair-rail height. This timeless style brings elegance and refinement while protecting walls from everyday wear. Paint them to contrast or complement the upper wall for added visual interest.

2. Beadboard Charm

Featuring slender vertical slats with distinctive grooves, beadboard adds a touch of cottage or coastal charm. Perfect for light-filled, relaxed spaces, it’s often painted in pastel or neutral tones to amplify its airy appeal.

3. Sleek Shiplap

Shiplap consists of horizontal wooden boards with clean gaps that cast subtle shadows. Originally associated with farmhouse style, it’s now used in modern and eclectic spaces alike. Paint it white for a fresh look or go bold with deep hues.

4. Contemporary 3D & Geometric Panels

Add a modern, artistic touch with 3D wall panels or geometric patterns. Available in materials like PVC and MDF, they come in a variety of designs—waves, hexagons, and more. These panels transform walls into works of art and make excellent feature walls.

5. Luxurious Fabric Panels

Upholstered wall panels infuse a room with softness and luxury. Covered in materials like velvet or linen, they enhance acoustics while creating a warm, inviting atmosphere. Great for cozy lounges or media rooms.


Installation Essentials: Tips for a Flawless Finish

Proper installation is key to ensuring your wall panels perform well and look exceptional:

  • Prep the Surface: Remove any old paint or wallpaper. Ensure walls are smooth, clean, and dry.
  • Plan Panel Placement: Begin from the center and work outward for balanced alignment.
  • Use Quality Adhesive: Follow manufacturer guidelines for adhesive application based on panel material.
  • Seal and Finish: Apply caulk to joints and seams for a seamless, professional appearance.

Wall Panel Care Made Simple

Keeping your panels looking pristine is easy with just a few simple habits:

  • Routine Cleaning: Dust regularly and wipe with a damp cloth to remove smudges.
  • Occasional Touch-Ups: Repaint or refinish panels when needed, especially in high-traffic areas.
  • Protect from Damage: Use felt pads under furniture and rugs to minimize scratches.

FAQs: Everything You Need to Know About Wall Panels

Q1: Can I use wall panels in any room of my home? A: Absolutely. Panels are suitable for living rooms, bedrooms, hallways, and even bathrooms—just ensure the material is moisture-resistant where needed.

Q2: Are wall panels renter-friendly? A: Yes. Many options are designed for easy installation and removal, making them ideal for temporary or leased spaces.

Q3: What’s the best material for wall panels? A: It depends on your goals. Choose MDF or wood for durability and warmth, PVC for moisture-prone areas, and fabric for acoustic improvement and a soft touch.

Q4: Will wall panels improve sound quality in a room? A: Yes. Fabric and acoustic panel walls reduce echo and noise, creating a more peaceful and pleasant environment.

Q5: Are wall panels cost-effective? A: Definitely. While offering high visual impact, they’re often more durable and easier to maintain than wallpaper or frequent repainting—making them a long-term value.


Style Meets Function in Wall Paneling

Wall panels offer an elegant, functional, engaging way to refresh your living room without major renovations. They provide a complete design solution with traditional and ultra-modern styles, and benefits like insulation, noise reduction, and durability. Whether you’re seeking a cozy retreat or a show‑stopping feature wall, there’s a wall panel option that fits your vision and elevates your home.

READ MOREREAD MORE
wall paneling

Elevate Your Walls: Creative Wall Paneling Designs for Every StyleElevate Your Walls: Creative Wall Paneling Designs for Every Style

Wall paneling is a powerful design element that adds dimension, texture, and sophistication to any interior. Whether you’re drawn to modern minimalism, rustic charm, or bold statement pieces, wall paneling offers a world of possibilities. This guide explores creative ideas to incorporate paneling into your home—blending visual appeal with functional benefits.


Classic Meets Contemporary: Styles That Inspire

Today’s interiors embrace a mix of old and new, and wall paneling is the perfect bridge between tradition and innovation. Consider these popular styles:

  • Shaker Panels: Simple, structured, and timeless—ideal for a clean, elegant look.
  • Slatted Panels: Sleek and modern, these add depth and verticality.
  • Geometric Designs: Make a bold statement with patterns and angular forms.
  • Wainscoting: A refined detail that enhances traditional and transitional spaces.

Functional and Beautiful: More Than Just Decor

Enhance Acoustics with Style

Wall paneling isn’t just for aesthetics—it can improve your space’s acoustics. In rooms like bedrooms, home theaters, or offices, acoustic wall panels reduce noise while maintaining visual appeal. For example, walnut slat panels offer sound control with a warm, luxurious finish.


Beyond the Living Room: Creative Paneling Locations

Wall paneling isn’t just for feature walls. Try these unexpected yet impactful applications:

Hallways

  • Add vertical wood slats to visually expand narrow passages.
  • Half-wall wainscoting adds character and depth.

Kitchens

  • Use waterproof panels as a low-maintenance yet stylish backsplash.
  • Introduce wood textures to soften modern kitchen finishes.

Bathrooms

  • Install moisture-resistant panels for a spa-like environment.
  • Choose tones like oak or walnut for a calm, organic feel.

Embracing the Trend: The Wood Drenching Effect

Wrap Spaces in Warmth

The “wood drenching” trend involves covering walls, ceilings, and even furniture in rich wood tones for a seamless, immersive design. Benefits include:

  • A cohesive and inviting ambiance.
  • Ideal for Scandinavian, rustic, or Japandi-style interiors.
  • A visual link between different zones in open-plan spaces.

Tip: Use light oak for a fresh, airy look, or dark walnut for bold sophistication.


Choosing the Right Panel for Your Home

Materials That Make a Difference

Each panel type brings its own aesthetic and functional advantages:

  • Wood Panels: Natural and timeless—ideal for warmth and texture.
  • MDF (Medium-Density Fiberboard): Customizable and budget-friendly.
  • PVC Panels: Moisture-resistant and easy to maintain.
  • Acoustic Panels: Enhance both sound quality and design.

Finishes to Fit Your Style

The right finish can define the room’s overall mood:

  • Matte: Soft and elegant—perfect for minimalist or modern spaces.
  • Glossy: Reflective surfaces add light and create a luxurious feel.
  • Natural Wood Grain: Adds organic richness and cozy texture.

DIY or Professional? Know Your Options

DIY Installation

  • More affordable, especially for small or simple projects.
  • Offers creative freedom and customization.
  • Requires tools, patience, and precision.

Professional Installation

  • Ensures flawless, long-lasting results.
  • Ideal for complex designs or larger areas.
  • Saves time and minimizes errors.

Beginner Tip: Start with peel-and-stick wood panels for a quick and stress-free transformation.


Frequently Asked Questions

Can wall paneling be installed over existing walls? Yes! Most panels can be applied over drywall, plaster, and tile—ideal for remodeling.

What’s the best paneling for humid spaces? PVC and waterproof MDF are perfect for moisture-prone areas like bathrooms and kitchens.

How do I maintain wood paneling? Regular dusting and occasional polishing are all you need. Avoid excessive moisture to preserve the finish.

Is wall paneling suitable for small rooms? Absolutely. Vertical paneling adds height, while light colors open up the space visually.

What are some budget-friendly paneling ideas?

  • MDF panels for painted finishes.
  • Peel-and-stick options for ease and savings.
  • Reclaimed wood for affordable, eco-conscious charm.

Design with Dimension and Purpose

Wall paneling is more than a decorative choice—it adds depth, personality, and functionality to your home. Whether your taste is traditional or contemporary, there’s a paneling solution to reflect your style. By experimenting with different materials, finishes, and placements, you can create a space that is both beautiful and uniquely yours.

READ MOREREAD MORE
functional wall panels

How Functional Wall Panels Can Elevate Your HomeHow Functional Wall Panels Can Elevate Your Home

Imagine walking into a home where the walls don’t only serve as a barrier—they talk. Not with music, but with elegance, texture, and comfort. This is the silent power of functioning wall panels. They’re not just about appearance. They aim to offer value, comfort, and character to your environment while remaining basic and functional. Whether you’re redecorating a single room or want to renew your entire house, wall panels are a simple and effective solution to transform any space without the hassle of a full remodel.

People frequently regard walls as plain surfaces. However, practical wall panels can be used for art, storage, sound absorption, and even mood setting. Let’s look at why more and more homeowners are choosing these design aspects and how they may genuinely boost your area.

From Modern to Classic: Wall Panel Styles That Fit Any Home

One of the most appealing aspects of functional wall panels is their versatility. Whether you want a rustic mood, a clean modern style, or a comfortable cottage atmosphere, there’s a wall panel for you. You may find them in a variety of materials, including wood, MDF, and even acoustic fabric-wrapped panels. Each one adds a unique tone and function to your room.

Functional wall panels don’t just sit pretty. In the right hands, they can also:

  • Hide uneven walls or surface issues.
  • Provide backing for mounted TVs or shelves.
  • Absorb sound in noisy rooms.
  • Create a natural break between spaces in open floor plans.

They not only add texture and interest, but they also bring functionality, especially in living rooms and bedrooms where comfort and calm matter most. If you’re in a warm, humid climate, there are wall panel choices designed for Florida homes that resist moisture and still look great.

Sound Absorption and Peaceful Spaces

Did you know that functional wall panels can help make your home quieter? Sound can easily pass through hard materials such as drywall. If you live in a busy house or apartment, this might be a daily aggravation. Noise can be reduced by using panels composed of soft or textured materials such as felt or wood slats over acoustic fabric.

Here’s how functional wall panels help:

  1. They break up sound waves rather than bouncing them back.
  2. They absorb echoes, especially in large, open rooms with hardwood floors.
  3. They muffle noise from the outside, which is perfect if you live near a street or busy area.

Want to explore what these panels actually look like? Take a peek at a curated collection of modern acoustic panel options that combine both form and sound control without sacrificing style.

Where Function Meets Beauty

Functional wall panels are not just about design; they also serve practical needs in everyday life. You can use them to make headboards, frame a fireplace, or create a reading corner. With the correct design, they can even incorporate concealed storage. This is what makes them actually functional.

Here are some great ways to use wall panels around the house:

  • Entryway: Add hooks and shelves between panels for keys, coats, and bags.
  • Bedroom: A wood panel behind the bed can work as a stylish headboard.
  • Living room: Frame the TV or make a feature wall that doubles as sound control.
  • Home office: Choose slatted panels to pin notes, artwork, or reminders.

Understanding Panel Types: A Quick Table

To make things easier, here’s a simple table explaining the most common panel types:

Panel TypeMaterialBest ForKey Feature
ShiplapWood or MDFFarmhouse, Beach HouseHorizontal boards, clean lines
Slat Wood PanelsOak, Walnut, VeneerModern, ScandinavianSound control, linear texture
Board and BattenMDF or PineTraditional HomesVertical rhythm and depth
Acoustic PanelsFabric-Wrapped MDFOffices, Studios, Living RoomsSound reduction, soft appearance
Reclaimed WoodSalvaged WoodRustic, Boho SpacesEco-friendly, unique textures

Each of these options offers both beauty and function, making them perfect examples of what functional wall panels can do in a home.

The Right Panel for Your Space

When picking the right panel, ask yourself:

  • Do I want to reduce sound in this room?
  • Am I trying to make a wall a focal point?
  • Is storage something I need from this space?
  • What’s my overall interior style?

Answering these questions will help you select a practical wall panel that meets both your demands and your aesthetic preferences. If you are unsure, start small. Before you tackle the entire room, try a panel behind your bed or sofa. If you’re ready to see examples and learn more about installation options, this helpful guide on acoustic wood panel walls gives a detailed look into the process and possibilities.

Caring for functional wall panels is usually as easy as wiping them down. Wood panels may need a polish once in a while, while painted MDF can be cleaned with a damp cloth. Avoid using strong cleaners unless the product guide says it’s safe. If you’re using acoustic panels, dusting with a vacuum brush or soft duster works great. Since many of these panels are made to last, your small efforts in care will go a long way.

Final Thoughts on Functional Panels

Sometimes the tiniest changes can have the biggest impact. Adding useful wall panels to your home is like putting texture on a blank canvas. They make rooms feel more polished, personalized, and comfy. And the best part? You don’t have to be an excellent designer to make a wise decision. With so many different styles, sizes, and applications available, it’s simple to discover something that works for your house and lifestyle. With a little forethought, creativity, and a creative touch, you can transform any ordinary wall into something beautiful—and functional.

Frequently Asked Questions (FAQs)

What are functional wall panels, and how are they different from regular panels?

Functional wall panels are more than just decorative. While regular panels may only add style to a wall, functional wall panels also serve a purpose. They can absorb sound, hide wall flaws, add storage, or act as a backdrop for things like TVs or shelves. They bring both beauty and usefulness to a space.

Can functional wall panels help with noise?

Yes, they can. Functional wall panels made from wood slats or acoustic fabric are great at soaking up sound. This makes rooms quieter and cuts down on echoes. They’re perfect for bedrooms, offices, or living rooms where peace and quiet matter.

Are wall panels hard to install?

Not at all. Many functional wall panels come ready to install with snap-on or stick-on options. Some panels need just a few tools and a level surface. If you’re unsure, you can always call a local installer to help. But for small areas, most people can do it themselves.

For a seamless renovation process, consider working with a team that specializes in digital design solutions.

READ MOREREAD MORE
Plumbing repair underway in kitchen.

Are Plumbers in High Demand in Australia? A Deep Dive into Warragul’s Plumbing Industry in 2025Are Plumbers in High Demand in Australia? A Deep Dive into Warragul’s Plumbing Industry in 2025

If you’ve been wondering, “Are plumbers in high demand in Australia?” — particularly in fast-growing regional hubs like Warragul, Victoria — you’re not alone. The answer is a resounding yes, and the reasons span economic, demographic, and infrastructural factors. As urban expansion continues beyond Melbourne’s fringe, towns like Warragul have emerged as hotbeds of residential and commercial development, driving up the demand for essential trades, especially qualified plumbers.

Plumbing repair underway in kitchen.

With Plumber Warragul, we’ll explore why plumbers are so sought after in Australia, examine the local plumbing demand in Warragul, and what this means for career prospects, homeowners, and the building industry.

📈 Why Plumbing is a High-Demand Trade Across Australia

The Australian construction industry has consistently fueled the demand for licensed tradespeople. Plumbing, being a critical infrastructure service, is integral to both new builds and renovations. According to the National Skills Commission, plumbing remains on the Skills Priority List, especially in regional areas like Gippsland, where a mix of urban sprawl and infrastructure upgrades is ongoing.

Key drivers of plumbing demand include:

  • Population growth in outer metropolitan and regional areas
  • An aging plumber workforce, with fewer apprentices replacing retirees
  • Increased regulation and compliance for water efficiency and environmental standards
  • Weather events such as floods and storms, which trigger emergency plumbing needs

🏡 Warragul, Victoria: A Plumbing Pressure Point?

Warragul, nestled in the Shire of Baw Baw, is a case study in why plumbing services are in high demand. With a population that’s surged past 18,000 residents and more new estates cropping up in the region each year, the pressure on plumbing infrastructure is tangible.

🚿 Residential Boom = Plumbing Boom

In recent years, Warragul has experienced significant residential expansion in suburbs like Waterford Rise, Brandy Creek Views, and Warragul South. Each new estate, duplex, and townhouse development requires:

  • Water supply connections
  • Sewerage system installations
  • Stormwater drainage solutions
  • Gas fitting and hot water system setup

These are all services carried out by licensed plumbers and gasfitters, most of whom are booked out for weeks in advance.

🔧 Aging Infrastructure in Older Areas

Meanwhile, central Warragul and nearby Drouin have legacy homes built pre-1980s that often need:

  • Pipe replacements
  • Hot water unit upgrades
  • Blocked drain clearance
  • Toilet and tapware servicing

The dual need to service both new construction and existing homes compounds the pressure on plumbing professionals.

🛠️ Salient Entities Fueling Plumbing Demand

To fully understand plumbing’s rise in relevance, let’s examine some key salient entities and players in Australia’s trade ecosystem:

  • Master Plumbers Australia and New Zealand (MPAANZ): Regulates training standards and licenses
  • Australian Building and Construction Commission (ABCC): Oversees building compliance
  • TAFE Gippsland: Offers plumbing apprenticeships near Warragul
  • Construction Forestry Maritime Mining and Energy Union (CFMEU): Represents trade workers’ rights

For plumbing needs, go to https://plumberwarragul.com.au/.

👨‍🔧 Career Outlook: Should You Become a Plumber in Warragul?

If you’re considering a career in plumbing, now is the perfect time — especially in regional Victoria.

📚 Education Pathway:

  • Certificate III in Plumbing through TAFE Gippsland
  • Completion of a 4-year apprenticeship
  • Registration with the Victorian Building Authority (VBA)

💰 Income Outlook:

The average salary for a qualified plumber in regional Victoria ranges from $75,000 to $110,000 per year, with emergency plumbers or those running their own business earning substantially more.

🧑‍🎓 Apprentice Pipeline:

Unfortunately, the number of plumbing apprentices in Gippsland hasn’t kept up with demand. This shortage opens doors for new entrants, career changers, and even women in trades, a demographic encouraged by state and federal programs.

🏗️ Impacts on Homeowners and Builders

For homeowners in Warragul, the high demand for plumbers means:

  • Longer wait times for non-urgent services
  • Higher hourly rates, particularly during peak periods
  • More difficulty securing same-day emergency plumbing

For builders and developers, tight plumbing supply chains can cause:

  • Delays in project timelines
  • Cost overruns
  • The need to contract plumbers from outside the region (e.g., Pakenham, Traralgon, or even Melbourne suburbs)

🌍 Local Context: A Warragul-Centric View

You can’t talk about plumbing demand in Warragul without noting the climate-specific and infrastructure-related challenges:

  • Heavy rainfall seasons make stormwater systems critical
  • Hilly terrain means more complex drainage installations
  • Expanding suburbs often require coordination with Warragul Civil Engineering teams and Baw Baw Shire Council permit approvals

Plumbers must stay up to date with local building codes, council regulations, and environmental compliance requirements unique to the Warragul area.

✅ Key Takeaways: Are Plumbers in High Demand in Australia (and Warragul)?

  1. Yes, plumbers are in very high demand across Australia, and the pressure is even higher in regional towns like Warragul.
  2. This demand is driven by population growth, construction booms, aging infrastructure, and apprentice shortages.
  3. Homeowners, builders, and even councils in Warragul are affected by a shortage of qualified plumbers, leading to longer wait times and rising costs.
  4. Aspiring plumbers in Warragul have a lucrative opportunity to fill a growing gap in the local trades market.
  5. If you’re searching for a plumber in Warragul, book ahead — and if you’re thinking about joining the trade, the timing couldn’t be better.

🧠 Final Insight

The demand for plumbers isn’t just a stat buried in a government report. In towns like Warragul, it’s a daily reality. From leaky taps to full plumbing installations, plumbers are essential to the heartbeat of regional living. Whether you’re a homeowner needing a hot water unit upgrade or a young apprentice looking for a future-proof trade, the message is clear: the pipes may be hidden, but the demand is in plain sight.

READ MOREREAD MORE
a high ranking plumber

What is the Highest Rank of Plumber? – Exploring Plumbing Careers in Warragul, AustraliaWhat is the Highest Rank of Plumber? – Exploring Plumbing Careers in Warragul, Australia

Plumbing is an essential trade, ensuring that the systems in our homes and businesses function smoothly. From water supply to drainage and gas lines, plumbers play a crucial role in maintaining public health and safety. But like any profession, plumbing offers a career path with different ranks and levels of expertise. So, what is the highest rank of plumber, and how does one attain it? With Plumber Warragul, we’ll delve into the different plumbing ranks, career progression, and highlight how this relates to the plumbing industry in Warragul, Australia.

a high ranking plumber

Understanding the Plumbing Profession

The plumbing industry is both diverse and integral to everyday life. Plumbers are responsible for installing, maintaining, and repairing piping systems that carry water, gas, and waste in residential, commercial, and industrial settings. Plumbing can be physically demanding and requires both practical skills and theoretical knowledge.

In Australia, plumbing is a regulated industry, with strict standards in place to ensure safety and quality. To become a plumber, one must undergo comprehensive training, complete an apprenticeship, and obtain appropriate licensing. But what are the different career levels within plumbing, and where does one begin?

The Career Path of a Plumber

In Warragul, a small regional town in Victoria, the pathway to becoming a professional plumber mirrors that of the rest of Australia, with local conditions and specific industry demands influencing career growth. Here’s a brief overview of the general career progression:

  1. Apprentice Plumber
    • Entry-Level Position: The first step in a plumber’s career is as an apprentice. Typically lasting 4 years, an apprenticeship combines on-the-job training with classroom education. Apprentices learn basic skills like pipefitting, drainage installation, and maintenance, alongside understanding plumbing codes and regulations.
    • Role in Warragul: In regional areas like Warragul, apprentice plumbers often gain practical experience by working with local plumbing businesses, gaining exposure to both residential and commercial projects.
  2. Tradesman Plumber
    • Post-Apprenticeship: After completing an apprenticeship, the plumber earns the title of a “tradesman plumber” or “licensed plumber.” This rank signifies that the plumber has the required qualifications and is authorized to work independently.
    • Skills and Responsibilities: Tradesmen are responsible for executing plumbing tasks such as pipe installations, maintenance, and repairs. In Warragul, a licensed plumber would typically be engaged in the installation of new plumbing systems for homes or local businesses, as well as performing emergency repairs.
  3. Master Plumber
    • The Highest Rank in Plumbing: The highest rank of plumber is that of a master plumber. To reach this level, a plumber must typically have several years of experience and pass additional examinations. A master plumber is often regarded as an expert in the field, capable of taking on the most complex and large-scale plumbing projects.
    • Advanced Expertise: Master plumbers are not only highly skilled in installing and repairing plumbing systems but also in interpreting complex building plans, ensuring compliance with plumbing codes, and managing plumbing projects from start to finish. They may specialize in areas such as gas fitting, backflow prevention, or solar hot water systems.
    • Business Ownership: Many master plumbers also run their own plumbing businesses. In Warragul, master plumbers are in demand for both residential and commercial services, overseeing teams of tradesmen and ensuring that all work is completed to the highest standards.

The Responsibilities of a Master Plumber

Reaching the rank of master plumber in Warragul or elsewhere in Australia requires not just technical knowledge but strong managerial skills. A master plumber’s responsibilities go beyond physical plumbing tasks and often include:

  • Project Management: Master plumbers are often in charge of large-scale projects, from residential constructions to complex industrial installations. They must coordinate with contractors, architects, and engineers to ensure plumbing systems are designed and implemented correctly.
  • Mentoring: As experienced leaders, master plumbers often mentor apprentices and tradesmen, passing on their knowledge and expertise. In a smaller town like Warragul, these mentoring relationships are crucial for maintaining the local plumbing workforce.
  • Compliance and Standards: Master plumbers are responsible for ensuring that all plumbing work meets legal and safety standards. They are familiar with Australian Plumbing Codes, local building regulations, and industry standards, ensuring that plumbing systems are safe and compliant.
  • Specialization: Master plumbers may choose to specialize in certain areas of plumbing, such as gas fitting, water treatment, or even energy-efficient plumbing solutions like solar hot water systems. In Warragul, where energy conservation is increasingly important, master plumbers with expertise in sustainable plumbing are especially valued.

How Do You Become a Master Plumber in Warragul?

Achieving the highest rank of plumber in Warragul like in Plumber Warragul, is a rewarding journey, but it requires dedication, skill, and years of experience. Here are the steps typically involved:

  1. Complete Your Apprenticeship: The first step is to complete a 4-year apprenticeship, learning from experienced plumbers in a real-world environment. Local plumbing companies in Warragul often offer apprenticeship programs that help individuals gain hands-on experience.
  2. Get Licensed: After completing an apprenticeship, you must pass exams and obtain a plumber’s license. This allows you to legally perform plumbing tasks independently.
  3. Gain Experience: To become a master plumber, you’ll need to accumulate several years of experience working as a licensed plumber. This allows you to build a broad skill set and specialize in certain aspects of the trade.
  4. Undertake Further Training: Some regions, including Warragul, may require additional training or certification in specialized areas, such as gas fitting, backflow prevention, or drainage.
  5. Pass the Master Plumber Exam: To officially achieve the rank of master plumber, you must pass a rigorous exam that tests your knowledge of plumbing systems, building codes, and regulations.
  6. Start a Business (Optional): Many master plumbers in Warragul choose to run their own plumbing businesses, managing teams of plumbers and overseeing large projects. This step requires additional business and management skills.

Why is Being a Master Plumber Valuable?

Being a master plumber is a prestigious career achievement, and in places like Warragul, it can provide both professional and personal rewards. Here are some reasons why becoming a master plumber is highly valued:

  • High Demand: With the growing population in regional areas, there is an increasing demand for skilled master plumbers to manage both new constructions and repairs.
  • Job Stability: The plumbing industry is essential, ensuring that master plumbers enjoy long-term job security.
  • Lucrative Salaries: Master plumbers tend to earn significantly more than their tradesman counterparts. This salary increase reflects their advanced expertise and responsibilities.

Conclusion

In summary, the highest rank of plumber in Warragul, Australia, is that of a master plumber. Achieving this level requires years of experience, advanced knowledge, and often a passion for the trade. Whether working independently or leading teams in large projects, master plumbers are respected for their expertise and their ability to ensure that plumbing systems are both efficient and compliant with all regulations. For anyone interested in a rewarding and stable career, pursuing the path to becoming a master plumber in Warragul is a solid choice.

READ MOREREAD MORE
a roofer working hard on sealing out roof

How Much Does It Cost to Seal a Roof in New Jersey?How Much Does It Cost to Seal a Roof in New Jersey?

Sealing your roof is one of the most effective ways to ensure it remains durable and well-protected from the elements. Whether you have an asphalt, metal, or tile roof, sealing it can provide an extra layer of protection, preventing leaks, damage from water, and even prolonging the lifespan of your roof. But how much does it cost to seal a roof in New Jersey? The price can vary based on several factors, such as the type of roof, the size of your home, and the specific contractor you hire. With CJ Commercial Roofing NJ, we will break down the average costs, factors that influence the price, and why roof sealing is an important maintenance task for homeowners in New Jersey.

a roofer working hard on sealing out roof

Average Cost of Sealing a Roof in New Jersey

The cost to seal a roof in New Jersey can range widely, depending on various factors. On average, homeowners can expect to pay between $1,500 and $3,500 for roof sealing services. This is for a typical residential home with a roof size of around 1,500 to 2,000 square feet.

The cost per square foot of roof sealing generally ranges from $0.50 to $3.00, depending on the type of roof you have. For example, sealing an asphalt roof is often less expensive than sealing a metal or tile roof. Additionally, the complexity of the roof, the pitch (steepness), and whether your roof requires any repairs before sealing can all influence the final price.

Factors That Influence Roof Sealing Costs in New Jersey

Several factors affect the cost of sealing a roof in New Jersey, including:

1. Type of Roof

Different roofing materials require different types of sealant, and some roofs are more complex to seal than others. Here are some common roof types in New Jersey and their sealing costs:

  • Asphalt Shingle Roofs: Asphalt shingles are one of the most common roofing materials in New Jersey. Sealing asphalt roofs typically costs $1,500 to $2,500. These roofs are relatively easy to work with, which keeps costs down.
  • Metal Roofs: Metal roofs are becoming increasingly popular due to their durability and energy efficiency. Sealing a metal roof in New Jersey can cost between $2,000 and $3,500, depending on the roof’s size and condition. Metal roofs require specialized sealants, and the work often involves more labor due to the type of metal used and the roof’s design.
  • Tile Roofs: Tile roofs are common in upscale homes and historic buildings in New Jersey. Sealing a tile roof typically costs $2,000 to $3,500, as it requires more detailed work and a specific type of sealant designed for tiles. Furthermore, tile roofs often need repairs before sealing, adding to the overall cost.

2. Roof Size

As with any roofing service, the size of your roof plays a significant role in determining the cost to seal it. Roofs larger than 2,000 square feet will typically incur higher costs. Additionally, if your roof has multiple levels or complex angles, this will increase the labor time and materials required, thus raising the overall price.

3. Condition of the Roof

Before sealing, the roof may need repairs or cleaning. If your roof has areas of damage, cracked shingles, or dirt buildup, these issues will need to be addressed first. This can increase the cost of sealing, as the contractor will need to perform extra work before applying the sealant.

4. Type of Sealant

There are different types of sealants available for roof sealing in New Jersey, each with its own price point:

  • Acrylic Sealants: Acrylic is a popular choice for asphalt shingles and is often the least expensive option, costing around $0.50 to $1.00 per square foot. Acrylic sealants are also UV-resistant, which is ideal for the hot summers in New Jersey.
  • Silicone Sealants: Silicone is commonly used for metal roofs or roofs with a steeper pitch. This sealant tends to be more expensive, with costs around $2.00 to $3.00 per square foot. However, silicone provides excellent waterproofing and is ideal for the rainy winters in New Jersey.
  • Polyurethane Sealants: Polyurethane sealants are less common but offer a high level of durability, making them suitable for roofs that experience a lot of foot traffic, such as flat roofs. Expect to pay around $1.50 to $2.50 per square foot for polyurethane.

5. Labor Costs

Labor costs can vary across different regions of New Jersey. In more urban areas like Jersey City or Newark, labor rates may be slightly higher due to the cost of living. However, in suburban areas like Princeton or Cherry Hill, you might find lower rates. Labor costs typically account for 30% to 50% of the total roof sealing price.

For professional and just cost, just go to CJ Commercial Roofing NJ.

Additional Costs to Consider

While the base price of sealing your roof includes the application of the sealant, there are a few additional costs that homeowners in New Jersey should be aware of:

  • Roof Inspection: It’s often a good idea to have a professional inspection done before sealing your roof, especially if it is older or has visible signs of wear. Inspections typically cost between $100 and $300 but can help identify any issues that need to be addressed before the sealing process.
  • Roof Repairs: If your roof has significant damage, such as missing shingles or cracks, repairs may be necessary before sealing. Depending on the extent of the damage, repairs can add anywhere from $200 to $1,500 to the overall cost.
  • Cleaning and Preparation: Cleaning the roof and preparing it for sealing is another added cost, especially for roofs that have debris or moss buildup. Roof cleaning can cost anywhere from $200 to $500, depending on the size and condition of the roof.

Why Seal Your Roof in New Jersey?

Sealing your roof in New Jersey offers several benefits that make it a wise investment for homeowners:

  • Protection Against Harsh Weather: New Jersey experiences all four seasons, and its roofs are often exposed to extreme weather conditions like heavy snow, ice, rain, and strong winds. Sealing your roof helps protect it from water damage, leaks, and deterioration caused by these weather conditions.
  • Extended Roof Lifespan: Roof sealing can help extend the lifespan of your roof. A well-maintained roof can last an additional 10-15 years when properly sealed, saving you money in the long run by preventing costly repairs or early roof replacement.
  • Improved Energy Efficiency: Sealing your roof can help improve the energy efficiency of your home. By preventing air leaks and reducing heat absorption, you can lower your energy bills, especially during New Jersey’s hot summer months.

Conclusion

In New Jersey, sealing your roof is a crucial maintenance task that can protect your home and increase your roof’s lifespan. The cost to seal a roof typically ranges from $1,500 to $3,500, depending on factors like roof type, size, and condition. Be sure to factor in any additional costs for repairs or cleaning. If you live in areas like Newark, Jersey City, or Princeton, it’s essential to hire a local roofing contractor who understands the unique weather conditions of New Jersey and can recommend the best sealant for your roof. By sealing your roof, you are investing in the long-term protection and efficiency of your home.

READ MOREREAD MORE
a roof gutter being attached

How Are Roof Gutters Attached in Melbourne, Australia? An Insightful GuideHow Are Roof Gutters Attached in Melbourne, Australia? An Insightful Guide

Roof gutters are essential components of a building’s drainage system, ensuring that rainwater is directed away from the roof and foundation. In Melbourne, Australia, where rainfall can be unpredictable, it’s vital to ensure gutters are properly installed. So, how are roof gutters attached, and why is the installation process so crucial for homes in Melbourne?

a roof gutter being attached

With Steve Arnie of Gutter Cleaning Melbourne, we’ll dive into the methods of attaching roof gutters, the different materials used, and why the installation process should be done with care, especially in Melbourne’s diverse climate.

Understanding Roof Gutters: The Basics

Before we explore the installation process, it’s important to understand what roof gutters are and why they’re crucial. Roof gutters, often referred to as eavestroughs in some regions, are channels installed along the edge of a roof to collect rainwater. These gutters are connected to downpipes that direct water away from the building’s foundation.

Melbourne experiences varied weather conditions, from heavy rains to long dry spells, making effective water drainage even more important. Properly installed gutters protect your property by preventing water from pooling around your home, which can cause damage to the foundation, walls, and landscaping.

Types of Roof Gutters and Materials

There are several types of roof gutters commonly used in Melbourne, and the materials used to make them can vary. Choosing the right type of gutter system for your home is crucial for functionality and longevity. Let’s take a look at the most common types and materials used:

  1. Quad Gutters (Australian Style) Quad gutters are a popular choice in Melbourne due to their ability to handle large amounts of water. These gutters have a deep, square shape, making them ideal for homes in areas prone to heavy rainfall.
  2. Half-Round Gutters Half-round gutters have a semi-circular shape and are another popular option in Melbourne. These gutters offer smooth water flow and are commonly used in both modern and traditional homes.
  3. Fascia Gutters Fascia gutters are integrated into the fascia board, providing a sleek and modern look. These gutters are often used in new construction projects, especially when the aesthetic appeal of the home is a priority.

The Process: How Are Roof Gutters Attached?

Now that we have an understanding of roof gutters, let’s explore how they are attached to the roof structure. The process of attaching gutters requires precision and the right tools. Here are the key steps:

Step 1: Measuring and Planning

Before installing gutters, accurate measurements must be taken along the roofline to determine the correct length of the gutters. In Melbourne, it’s essential to factor in local weather conditions, such as the frequency of heavy rainfall, which could influence the number of downpipes needed.

Gutter systems should be designed to slope towards the downpipes to ensure water flows efficiently. A slope of approximately 1:500 is typically recommended. If you’re unsure about measurements and slope calculations, it’s advisable to consult with a local Melbourne roofing expert who understands the area’s weather patterns.

Step 2: Preparing the Roofline

Once the measurements are taken, the next step is to prepare the roofline. This involves installing brackets or hangers that will hold the gutters in place. These brackets should be spaced at regular intervals, generally 600mm apart. The brackets must be secured to the fascia board (the horizontal board under the edge of the roof) to provide a stable support structure.

In Melbourne’s coastal areas, the materials used for brackets and hangers should be resistant to corrosion due to the salty air. Galvanized steel or powder-coated aluminum are commonly used for durability.

Step 3: Attaching the Gutters

Once the brackets are installed, the gutters are attached. The type of fasteners used will depend on the material of the gutter. For metal gutters, screws or rivets are typically used to secure the gutters to the brackets. Gutters should be gently bent or shaped to fit the roofline perfectly. They must be sloped slightly to encourage water to flow toward the downpipes.

For Melbourne homes, it’s important to ensure the gutter is securely attached, as heavy rainfall during winter months can put extra stress on improperly installed gutters. Additionally, gutters should be attached tightly to prevent movement, which could lead to water overflow or leaks.

Step 4: Installing Downpipes

Downpipes are the final component of the gutter system. They are attached to the gutter and direct water from the roof into the ground drainage system. In Melbourne, the downpipe placement is critical, as it must be connected to an efficient stormwater drain to prevent water from pooling around the property.

Downpipes should be positioned at regular intervals along the roofline, usually at the corners or points where water accumulation is most likely. They should also be securely fastened to the building’s exterior walls to prevent them from swaying or coming loose during high winds.

For professional needs, just go to https://gutter-cleaning-melbourne.com.au/.

Common Mistakes to Avoid During Gutter Installation

Gutter installation may seem straightforward, but there are several common mistakes that can lead to inefficiency or even damage. Here are some key things to avoid:

  1. Incorrect Slope If the gutters are not properly sloped, water may not flow efficiently toward the downpipes. This can lead to water pooling in certain areas, causing leaks or rusting of the gutter material over time.
  2. Improper Gutter Size Choosing gutters that are too small for the expected volume of water can lead to overflow during heavy rains. This is particularly important in Melbourne, where stormwater management is crucial.
  3. Poorly Secured Brackets Brackets that are not securely attached can result in the gutters sagging over time. This can cause water to overflow or even damage the roof structure.
  4. Neglecting Regular Maintenance Gutters need to be cleaned regularly to remove debris that can block water flow. In Melbourne, leaves from native trees and debris from wind storms can accumulate quickly, obstructing water flow and increasing the risk of damage.

Conclusion: Ensuring Long-Lasting Roof Gutter Installation in Melbourne

Roof gutters are crucial for protecting your property from water damage, especially in Melbourne’s variable climate. Proper installation involves precise measurements, high-quality materials, and attention to detail. By understanding how roof gutters are attached, homeowners in Melbourne can ensure their gutters function efficiently and last for many years.

Whether you’re upgrading your existing gutters or installing a new system, it’s always best to consult with a local roofing professional who is familiar with Melbourne’s specific weather conditions. Properly installed gutters can protect your home, enhance its aesthetic appeal, and increase its longevity.

For anyone in Melbourne looking to protect their investment, investing in quality roof gutter installation is an essential step.

READ MOREREAD MORE
a shiny new gutter

How Much Does New Guttering Cost in Melbourne, Australia? A Complete 2025 GuideHow Much Does New Guttering Cost in Melbourne, Australia? A Complete 2025 Guide

Guttering may not be the most glamorous part of your home, but it plays a critical role in protecting your property from water damage. In a city like Melbourne, known for its four-seasons-in-a-day weather, ensuring your guttering system is in top condition is more of a necessity than a luxury.

a shiny new gutter

If you’re wondering, “How much does new guttering cost in Melbourne?”, you’re not alone. In 2025, homeowners across Victoria are re-evaluating the health of their roofing systems amid increased rainfall and storm intensity. With Steve Arnie of Gutter Cleaning Melbourne, we’ll breakdown gutter replacement pricing, installation factors, and tips to save money—while ensuring your home stays dry and damage-free.

Average Guttering Cost in Melbourne: 2025 Snapshot

The cost of new guttering in Melbourne varies depending on several factors, including material, property size, and installation complexity. On average, homeowners can expect to pay:

  • $30 to $60 per linear metre for standard Colorbond steel guttering
  • $50 to $120 per linear metre for premium materials like zincalume, stainless steel, or copper
  • $2,000 to $4,500 for full gutter replacement on a typical single-storey home

Keep in mind, these are general figures. For a three-bedroom home in Melbourne’s eastern suburbs (e.g., Box Hill or Doncaster), a full replacement using Colorbond gutters with downpipes and fascia replacement might land around $3,200 to $3,800.

Key Factors That Influence Guttering Costs

Let’s dive deeper into what actually drives the price of new guttering in Melbourne:

1. Material Type

Choosing the right gutter material significantly affects both upfront costs and long-term maintenance:

  • Colorbond – Affordable, durable, and ideal for Melbourne’s climate
  • Zincalume – Offers a clean aesthetic with strong anti-corrosive properties
  • Aluminium – Lightweight and rust-resistant, great for cost-conscious homeowners
  • Copper – High-end choice; visually stunning but expensive
  • PVC / Vinyl – Budget-friendly but not ideal for homes exposed to intense sun or storm activity

➡️ Insider tip: In Melbourne’s coastal suburbs like Brighton or St Kilda, stainless steel or Colorbond with anti-corrosion coatings is a smart investment.

2. Roof Accessibility

A complex roofline, second-storey heights, or difficult access (think tight laneways in Fitzroy or Carlton) can hike up labour costs. Expect to pay 15–30% more if scaffolding or elevated platforms are needed.

3. Property Size & Gutter Length

A larger roofline equals longer gutter runs. If your home has architectural features like parapets or dormers, your installer may need to custom-fit sections, increasing costs.

4. Extras: Fascia Repairs, Downpipes & Leaf Guards

Most quotes don’t just include the gutters:

  • Downpipe installation: $50–$150 per unit
  • Fascia board replacement: $10–$30 per linear metre
  • Gutter guards: $30–$50 per metre (worth it in leafy suburbs like Camberwell or Glen Waverley)

Installation & Labour Costs in Melbourne

You’ll find that licensed guttering specialists in Melbourne charge on average:

  • $50 to $90 per hour, depending on experience and qualifications
  • Most full installations take 1–2 days, weather permitting

To ensure quality work, always hire a roof plumber registered with the VBA (Victorian Building Authority). This protects you legally and ensures compliance with Melbourne’s building codes.

Choosing the Right Guttering for Melbourne’s Climate

Melbourne’s weather is as varied as its coffee choices. From sudden hailstorms in Moonee Ponds to 40-degree scorchers in Sunbury, your guttering needs to handle extremes.

Look for:

  • Thermal expansion resistance
  • Anti-corrosion treatments
  • Effective water flow capacity
  • Compatibility with solar panel runoff

Brands like Lysaght, Ace Gutters, and Stratco are popular choices across Victoria and offer solid warranties backed by local support.

Cost Comparison: DIY vs. Professional Guttering

Thinking about going DIY to save a few bucks?

TaskDIY Cost RangePro Cost Range
Basic Gutter Kit (10m)$150–$250N/A
Tools & Safety Gear$200–$400Included
Time (per metre)1–2 hours15–30 mins
Risk of Errors/LeaksHighLow

🙄 Unless you’re handy and have experience with roof safety, professional installation especially with Steve Arnie of Gutter Cleaning Melbourne is the wiser path. Improperly installed gutters can lead to water ingress, timber rot, and even undermine your home’s foundations.

How to Save on Gutter Replacement in Melbourne

💡 Smart homeowners know how to cut costs without cutting corners:

  1. Compare at least 3 quotes – Use platforms like Hipages or ServiceSeeking to find licensed roof plumbers near you.
  2. Schedule off-season – Avoid peak spring and summer months when demand spikes.
  3. Bundle services – Some companies offer discounts when combining roof repair, guttering, and painting.
  4. Ask about warranties – A 20-year material warranty is standard for Colorbond in Melbourne.

Local Guttering Providers to Check Out

Here are a few Melbourne-based guttering specialists to consider:

  • O’Boyles Roof Plumbing (West Melbourne) – Known for prompt service and solid warranties
  • Roofrite (Heidelberg) – Offers fascia and gutter packages
  • Eastern Guttering Services (Ringwood) – Servicing the Yarra Ranges and eastern suburbs

Always check reviews on Google or ProductReview.com.au, and verify licensing with the Victorian Building Authority.

Final Thoughts: Is New Guttering Worth It?

If you’ve got overflowing gutters, water staining on internal walls, or sagging sections, delaying replacement can cost you more in the long run.

In Melbourne’s unpredictable climate, investing in high-quality, professionally installed guttering is like giving your home an insurance policy against the elements.

So, how much does new guttering cost in Melbourne? While prices range depending on material and property specifics, investing $3,000–$4,000 today could save you $10,000+ in future repairs.

READ MOREREAD MORE

Dumpster Rental Springfield MO: Same-Day Delivery & Easy BookingDumpster Rental Springfield MO: Same-Day Delivery & Easy Booking

Whether you’re tackling a home cleanout, a remodeling project, or managing a job site, finding a reliable dumpster rental in Springfield MO is essential. The ability to book quickly and get same-day delivery can make or break your project timeline. Fortunately, local providers offer services that are fast, flexible, and easy to schedule.


Why Same-Day Delivery Matters

Projects don’t always go according to plan. When cleanup needs arise unexpectedly—after a storm, during a last-minute move, or mid-renovation—same-day delivery ensures you don’t lose time waiting for waste removal.

Many dumpster rental Springfield MO companies have local inventory ready to dispatch. Roll-off containers can often be delivered within hours, helping homeowners, contractors, and property managers stay on schedule. Fast delivery is especially important when space is limited or permits are time-sensitive.


Easy Online Booking Options

Gone are the days of long phone calls and paperwork. Most Springfield dumpster companies now offer online booking with instant quotes and date selection. You simply:

  • Choose your dumpster size
  • Enter your address or zip code
  • Select a delivery date and rental duration
  • Confirm payment or request a callback

Services like Rolloff Express, Midwest Dumpster Rentals, and Trash Time Disposal are known for user-friendly digital platforms and fast responses, even outside standard business hours.


Dumpster Sizes Available

Local providers typically offer a range of roll-off dumpster sizes to match different types of cleanups:

  • 10-yard dumpsters – Best for garage cleanouts, yard debris, or small renovation jobs
  • 20-yard dumpsters – Ideal for flooring removal, roof replacements, or kitchen remodels
  • 30-yard dumpsters – Great for multi-room cleanouts or construction waste
  • 40-yard dumpsters – Suited for large demolitions, commercial work, or major home projects

Booking the right size helps avoid overage fees and multiple pickups.


Flat-Rate Pricing and Fast Quotes

Many Springfield dumpster rental companies offer flat-rate pricing. This usually includes:

  • Delivery and pickup
  • A set rental period (3–7 days standard)
  • Disposal up to a specific weight limit

Additional charges may apply for extended time, extra weight, or restricted items. Some providers offer volume-based pricing or flexible plans for recurring use on job sites.

To get the most accurate quote, be ready to share:

  • The type of material you’re disposing of
  • The size of your project
  • Where the dumpster will be placed

Driveway-Friendly & Residential Options

Not every property has a wide open lot. For homes with limited space or HOA restrictions, providers like Bin There Dump That and Honey Do Dumpster Rentals offer compact, driveway-safe dumpsters. These containers include:

  • Protective boards to prevent surface damage
  • Smaller footprints for tight areas
  • Walk-in doors for easy loading

This makes them ideal for residential customers handling decluttering, light renovations, or moving prep.


Commercial and Contractor Services

For builders, remodelers, and facility managers, same-day dumpster delivery keeps job sites clean and compliant. Companies like Springfield Dumpster Service and Ozarks Dumpster Solutions offer:

  • Larger bins (20–40 yards)
  • Flexible pickup schedules
  • Support for heavy debris and high-volume loads

They also help ensure you’re following local waste disposal regulations and can often accommodate multiple projects across different locations.


Materials Accepted

Most standard dumpsters in Springfield accept:

  • Household junk
  • Furniture and appliances (non-refrigerated)
  • Yard waste
  • Construction debris (wood, drywall, shingles)

Materials not allowed include:

  • Paint, oil, and hazardous chemicals
  • Tires and batteries
  • Electronics with screens
  • Refrigerators or AC units (without prior approval)

Always ask your provider for a full list to avoid delays or added fees.


Permits and Placement Info

Placing a dumpster on your own property typically doesn’t require a permit. If the bin must go on the street, sidewalk, or shared space, you may need a temporary permit from the City of Springfield. Check with your provider—they’ll guide you through the process or let you know if one is needed.

READ MOREREAD MORE
a roofer working well on roof construction

What Do Most Roofers Charge Per Square in West Palm Beach, Florida?What Do Most Roofers Charge Per Square in West Palm Beach, Florida?

Understanding Roofing Costs and Local Industry Trends in 2025

When planning a roofing project, one of the first questions homeowners ask is: What do most roofers charge per square? In West Palm Beach, Florida, where the subtropical climate and hurricane season heavily influence roofing needs, the answer is more nuanced than a simple price tag. Understanding the going rate, what it includes, and how local factors impact costs can save you thousands—and headaches.

a roofer working well on roof construction

🧱 What Is a “Square” in Roofing?

Let’s clarify the jargon: in roofing, a “square” equals 100 square feet of roofing material. When roofers quote by the square, they’re referring to labor and materials required to cover that area. So if your home has 25 squares of roofing area, that’s 2,500 square feet.

📈 Average Roofing Costs per Square in West Palm Beach, FL

As of 2025, the average roofing cost per square in West Palm Beach ranges from $375 to $650, depending on several key variables:

Roof MaterialCost Per Square (Installed)
Asphalt Shingles$375 – $525
Metal Roofing$600 – $850
Tile Roofing$700 – $1,000+
Flat/Modified Bitumen$400 – $600

🏡 Local Insight: Due to West Palm Beach’s humidity and storm risks, many homeowners are opting for metal or tile roofs, which offer greater durability and wind resistance.

🏗️ What Factors Influence Roofer Pricing in West Palm Beach?

Roofing quotes aren’t just pulled out of thin air. The price per square reflects more than just shingles:

1. Roof Complexity

  • Steep slopes, multiple valleys, skylights, and chimneys increase labor.
  • Tile and metal roofs demand more precise installation and safety gear.

2. Underlayment & Decking Repairs

  • South Florida roofs often suffer moisture damage.
  • Underlayment replacement, decking board fixes, and flashing upgrades can add $1.50–$3.00 per square foot.

3. Permit Requirements

  • Palm Beach County enforces strict roofing codes.
  • Roofing permits alone can cost $200 to $450, and inspections are mandatory.

4. Hurricane Compliance

  • After Hurricane Ian and Irma, many roofers offer Class 4 impact-resistant roofing systems.
  • These upgrades may increase costs by 15% but can lead to insurance discounts.

🔍 Roofing Estimates: What Should Be Included?

If you’re getting quotes from local roofing contractors in West Palm Beach, ensure the estimate includes:

  • Tear-off and disposal of old roofing
  • Underlayment installation
  • Drip edge, flashing, and roof vents
  • Warranty details (labor + materials)
  • Cleanup and debris removal
  • Permit fees and inspection coordination

👷‍♂️ Pro Tip: Always verify if the roofer is licensed and insured in the state of Florida. The Florida Department of Business and Professional Regulation (DBPR) provides a searchable database for verification, see https://starroofingcontractors.com/.

🔧 Local Roofing Companies Worth Considering in West Palm Beach

To ensure you get both quality and competitive pricing, consider reaching out to some reputable names:

  • Storm Guard Roofing & Construction – Palm Beach
    Known for insurance-friendly roofing after storm damage.
  • Tiger Team Roofing – South Florida
    Specializes in tile roofs and hurricane-compliant systems.
  • G&W Roofing
    Offers free inspections and extended warranties on asphalt and metal roofs.

🏘️ Roof Replacement vs. Roof Repair

Sometimes, homeowners can save money by opting for a targeted roof repair instead of full replacement. Here’s a quick breakdown:

Project TypeAverage Cost (West Palm Beach)
Minor Roof Repair (per square)$150 – $350
Full Roof Replacement (per square)$375 – $650

📊 If more than 25% of the roof is damaged, Florida Building Code may require a full replacement to bring the entire system up to current standards.

💡 Tips for Hiring a Roofer in West Palm Beach, FL

✅ Compare at least 3 quotes

Look for transparency, breakdown of costs, and warranty offerings.

✅ Ask about manufacturer certifications

Roofers certified by GAF, Owens Corning, or CertainTeed offer better warranties.

✅ Read online reviews & check BBB ratings

West Palm Beach residents rely on Google Reviews, Angie’s List, and HomeAdvisor for insights into service quality.

✅ Time it right

Spring and fall are busy. Booking during late summer or early winter could save you up to 10%.

🌴 Local Considerations for Roofing in West Palm Beach

West Palm Beach isn’t just another dot on the map. With its coastal exposure, humidity, and tropical storms, the roofing industry here has evolved uniquely:

  • Reflective roofing is gaining popularity to beat the heat and cut A/C costs.
  • Cool roofs that meet ENERGY STAR standards are eligible for Florida solar and energy efficiency incentives.
  • Tile roofs, long considered luxury, are increasingly viewed as necessary in upscale communities like Palm Beach Gardens, Wellington, and Lake Worth.

For professional work, just go to https://starroofingcontractors.com/.

📘 Final Thoughts: What Do Most Roofers Charge Per Square in West Palm Beach, FL?

If you’re planning a roofing project in West Palm Beach, understanding the cost per square is just the beginning. Expect $375 to $650 per square for asphalt, more for premium materials, and always factor in local codes, hurricane prep, and the unique demands of South Florida weather.

🎯 Bottom line: Get multiple quotes, verify credentials, and choose a roofer who understands the local climate, codes, and materials best suited to West Palm Beach homes.

🧰 Frequently Asked Questions

Q: Are roofing estimates free in West Palm Beach?

A: Most reputable roofers offer free on-site estimates.

Q: Can I finance a roof replacement in Florida?

A: Yes, many local contractors offer in-house financing or work with lenders.

Q: Does homeowners insurance cover roof replacement?

A: If the damage is storm-related, yes. File a claim with clear documentation and get a roofer who understands insurance adjuster language.

READ MOREREAD MORE